Make Gunge-Vector Style Art
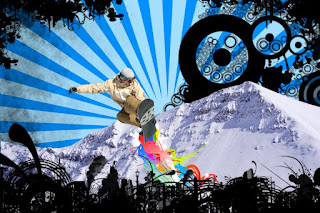
I love making vector-grunge based styles that can be used for design in Photoshop. So today, I'm going to show you how to make them in Gimp. We are going to attempt something I made in Photoshop:

First, you going to need a few things.
Urban Designs Brushes.
Snowboarder stock.
Mountain Stock.
Vector Foliage Brushes.
Splatter Brushes.
Grunge Brushes.
Hair PSD.
Scribble PSD.
Sun Rays.
To install the brushes, refer to my guide here. Remember, you can click on the images below to view them full size.
1) Open your mountains in Gimp. Duplicate the layer. Delete the original layer. We do this so the mountains are not on the background.
2) Get out the paths tool and render the mountains.

3) File > Open as Layers. Select the Sun Rays image you downloaded. I actually had to create this in Photoshop seeing as it is difficult to make in Gimp. Drag the Sun Rays layer to the background.
4) File > Open as Layers. Select the snowboarder. Render the snowboarder. Resize and place as desired.

6) Go to the layers dialog and lock every layer by clicking the chain symbol. Image > Scale Image. Type 800 in the width and 533 in the length. Click ok. Everything should be resized.
5) Open up the hair PSD as a separate document in Gimp. Pick the magic wand tool and select one of the designs. Get the gradient tool. Pick a bright color, such as bright red, for the foreground color. Make white the background color. Use the gradient tool on the selection. Select > Deselect. Get the lasso tool and make a selection around the design. Copy it and paste it into a new layer in your snowboarder image. Rotate and reposition it behind your snowboarder as desired. Continue doing this with other hair image. Experiment with layer order, size, rotation, colors, etc.

6) Open up the scribbles PSD and do the same.

7) Merge the scribbles and hair designs to one layer. Create a new layer and name it "under splatter." Drag this layer under neath the hair & scribbles layer. Get out the paint brush tool. Select white as your foreground color. Pick one of the splatter brushes and try to achieve something similar to mine.

8) Still using the paint brush, pick one of the fuzzy brushes. Add little white fuzzy dots within the colorful tail. Don't go overboard.

9) Create a new layer, name it "Grunge." Drag it down between the background and the mountain layer. Get out your grunge brushes. Make your foreground color black. Achieve something like mine. Experiment with opacities and sizes.

10) Create a new layer between the grunge layer and the mountains layer. Get out the urban designs brushes. Play around with them behind the mountain.

11) Create a new layer named "black splatter top." Leave the layer on top. Using a mixture of your urban designs brushes and your splatter brushes, achieve something like mine below. Experiment with sizes, placement, etc.

12) Create a new layer on top of the others. Name it "black splatter front." Again, use your urban designs brushes, splatter brushes, and vector foliage brushes to achieve something like mine.

Save it and you're done!!

First, you going to need a few things.
Urban Designs Brushes.
Snowboarder stock.
Mountain Stock.
Vector Foliage Brushes.
Splatter Brushes.
Grunge Brushes.
Hair PSD.
Scribble PSD.
Sun Rays.
To install the brushes, refer to my guide here. Remember, you can click on the images below to view them full size.
1) Open your mountains in Gimp. Duplicate the layer. Delete the original layer. We do this so the mountains are not on the background.
2) Get out the paths tool and render the mountains.
3) File > Open as Layers. Select the Sun Rays image you downloaded. I actually had to create this in Photoshop seeing as it is difficult to make in Gimp. Drag the Sun Rays layer to the background.
4) File > Open as Layers. Select the snowboarder. Render the snowboarder. Resize and place as desired.
6) Go to the layers dialog and lock every layer by clicking the chain symbol. Image > Scale Image. Type 800 in the width and 533 in the length. Click ok. Everything should be resized.
5) Open up the hair PSD as a separate document in Gimp. Pick the magic wand tool and select one of the designs. Get the gradient tool. Pick a bright color, such as bright red, for the foreground color. Make white the background color. Use the gradient tool on the selection. Select > Deselect. Get the lasso tool and make a selection around the design. Copy it and paste it into a new layer in your snowboarder image. Rotate and reposition it behind your snowboarder as desired. Continue doing this with other hair image. Experiment with layer order, size, rotation, colors, etc.
6) Open up the scribbles PSD and do the same.
7) Merge the scribbles and hair designs to one layer. Create a new layer and name it "under splatter." Drag this layer under neath the hair & scribbles layer. Get out the paint brush tool. Select white as your foreground color. Pick one of the splatter brushes and try to achieve something similar to mine.
8) Still using the paint brush, pick one of the fuzzy brushes. Add little white fuzzy dots within the colorful tail. Don't go overboard.
9) Create a new layer, name it "Grunge." Drag it down between the background and the mountain layer. Get out your grunge brushes. Make your foreground color black. Achieve something like mine. Experiment with opacities and sizes.
10) Create a new layer between the grunge layer and the mountains layer. Get out the urban designs brushes. Play around with them behind the mountain.
11) Create a new layer named "black splatter top." Leave the layer on top. Using a mixture of your urban designs brushes and your splatter brushes, achieve something like mine below. Experiment with sizes, placement, etc.
12) Create a new layer on top of the others. Name it "black splatter front." Again, use your urban designs brushes, splatter brushes, and vector foliage brushes to achieve something like mine.
Save it and you're done!!


No comments:
Post a Comment